Category: Recipes

Tasteful Thursdays- Milk Chocolate Cherry Cheesecake by Chef Megha Kohli (Lavaash by Saby)

To make your Thursdays more tasteful, we bring to you a mouth watering recipe by Chef Megha Kohli. Megha is a very talented chef and is responsible for all that finger licking good food that you eat at Lavaash by Saby.

10676346_10153470406799333_835644813527308191_n

So get set, try out this recipe and do leave your comments and share pictures of your preparations once you make it.. Happy Feasting..!!

  • PREP TIME- 15-20 mins AT 150
  • PORTION SIZE-12 SLICES, 150gms (ONE SLICE)
  • SHELF LIFE-2-3 days

INGREDIENTS-


Cheesecake mix-


  1. CREAMCHEESE-950gms
  2. CREAM-200 gms
  3. VANILLA STICK-1
  4. VANILLA ESSENCE-2-3 drops
  5. SUGAR-250gms

For cheesecake base


  1. OREO COOKIE-2 packets
  2. BUTTER-50gms
  3. CHOCOLATE SHAVINGS-50gms+5gms (to put in the base)
  4. SUGAR COATED WALNUTS-10 gms

SUGAR COATED WALNUTS-


  1. WALNUTS-10 gms
  2. EGG WHITE-1
  3. ICING SUGAR-5gms

MATERIALS REQUIRED-


  1. 10-INCH CAKE TIN
  2. SILVER FOIL
  3. BAKING TRAY
  4. KITCHEN AID WITH PADDLE ATTACHMENT

CHOCOLATE GANACHE-

  1. CHOCOLATE-200gms
  2. AMUL CREAM-100gms
  3. MILK-200gms

METHOD-


  • SUGAR COATED WALNUTS-Mix icing sugar and egg white together and coat the walnuts, then bake the walnut on a baking tray for 10 mins at a temperature of 150.
  • CHOCOLATE GANACHE-take equal quantities of chocolate and milk, boil milk and cream melt the chocolate in it, mix it properly.
  • FOR THE BASE-crush Oreo cookies and add melted butter and set it in the mould and bake it for 10 mins, keep it to cool, once cooled put chocolate shavings and sugar coated walnuts.
  • In a mixing bowl add cream cheese, amul cream, milk powder, corn flour, vanilla stick, vanilla essence, sugar and coffee and with the help of a paddle attachment mix the ingredients properly.
  • Once the mix is ready, pour it inside the cake tin on top of the Oreo base, put silver foil at the bottom of the cake tin and put it over the baking tray and pour little water on the tray and bake it for 15-20 mins at a temperature of 150.
  • Once baked keep it aside to cool and then de-mould and refrigerate it.

ASSEMBLY/PLATING


On a chakli keep 150gms slice of cheesecake on the left side, pour chocolate ganache on top of it.top it with 3 cheeries , on the rite side make a stroke with the cherry sauce and dust it with icing sugar.

milk-chocolate-and-cherry-cheesecake


Tasteful Thursdays.. Bagiche Ki Sabziyan recipe by Chef Sartaj from Pride Plaza, Aerocity

Bagiche ki sabziyan (2 portion recipe)

Shared by Chef Sartaj who is an expert in Indian and Mughlai Cuisine, I myself tasted this beautiful recipe by him during my visit to Pride Plaza Hotel, Aerocity. I can vouch for it, its simply yumm. You can read my entire review here and enjoy this wonderful recipe by Chef Sartaj.

chef-sartaj-qureshi


Ingredients


  • Brinjal: 100gm
  • Lady Finger: 100gm
  • Cauliflower: 100gm
  • Red Pepper: 100 gm
  • Green Capsicum: 100 gm
  • Yellow Pepper: 100 gm
  • Chopped Green Chilly: 10 gm
  • Chopped Ginger: 10gm
  • Chopped Garlic: 10gm
  • Chopped Coriander: 10gm
  • Dice tomato: 50gm
  • Brown onion paste: 100gm
  • Lemon Juice :10 ml
  • Boiled Cashew paste: 50 gm
  • Beaten curd: 60gm
  • Cumin Seeds: 2gm
  • Vegetable Oil: 100ml
  • Turmeric Powder: 5gm
  • Red Chilli Powder: 10gm
  • Cumin Powder: 5gm
  • Coriander Powder: 10gm
  • Raw Mangoo Powder: 5gm
  • Salt: to taste
  • Julienne ginger/Coriander leaves : for the garnish

Method

  • Wash all the vegetables, and cut them in finger shape separately.
  • Fry Brinjal, Lady Finger and Cauliflower separately.
  • Take a pan, pour oil and heat it. Then put brown onion paste into the heated oil.
  • Thereafter put turmeric, coriander and red chilli powder.
  • Saute for 2 minutes.
  • Now add beated curd into the mixture.
  • Cook for 2 minutes.
  • Add cashewnut paste.
  • Then cook on low heat until the oil comes on top and is visible.
  • The gravy is ready now.
  • Take a fry pan, pour a tablespoon of oil, and add garlic, ginger and chilly to it.
  • Add capsicum and bell peppers with diced tomato.
  • Toss it and put all the fried vegetables.
  • After that pour the gravy in same mixtures.
  • Then dry all vegetables together.
  • Lastly, put cumin powder, raw mangoo powder and lemon juice for taste.
  • Now the vegetable is ready to serve with hot chapatti.
  • Garnish the dish with ginger julienne and coriander leafs on top.


img_6506

Tasteful Thursdays- Bacon & Maple Syrup Ice-Cream Recipe by Chef Pawan Bisht

A dear friend and a great chef, when you find in one person, it makes for a lethal combination. Chef Pawan Bisht, Head chef at a very popular restaurant Junglee Billee is a dear friend and upon my request, he has shared one of his most favourite recipes. I am sure you all gonna love it, and watch out this space every Thursday for more recipes.

jb-09


Bacon and maple syrup ice cream

  • Time:-2.30 hrs
  • Prep:-2 hr 15 mins.
  • Cooking:-15 mins.
  • Yield:- 1 quart

Ingredients:-

  • 3 large egg yolks
  • ¼ cup sugar
  • 1 cup whole milk
  • 2 cup heavy cream
  • 3-4 strips bacon
  • 1 cup maple syrup
  • ½ cup caramelized walnut

Procedure:-


  • Whisk the egg yolk and sugar in a bowl. Transfer it to a sauce pan and pour the milk. Whisk it well.
  • Cook this mixture on a low heat, stirring on a regular interval.
  • Once the mixture is thick enough to coat the back of the spoon add the maple syrup. Mix well.
  • Pour this mixture in a bowl and refrigerate till cold, approx 30 -45 minutes.
  • Meanwhile take a pan and put it over the medium gas range, once heated sear the bacon on it till crispy.
  • Once the bacon is cooled down cut it into small pieces leaving 1 or 2 strips for the garnish.
  • Take out the custard from the freeze and pour the cream in it.
  • Add the caramelized walnut, bacon pieces and churn the mixture.
  • Pour this mixture in an air tight container and freeze until firm at least 2 to 3 hours.
  • Serve garnishing with crispy bacon strips and caramelized nuts.

For caramelized nuts:-


  • Take a pan and put it on a low heat. Add sugar to it and melt it till golden brown colour.
  • Add nuts to this mixture. Mix well.
  • Pour this mixture on a baking sheet and let it cool.
  • Once cooled down break it nicely into small pieces.
  • Add it to the ice cream to get the crunch.

bacon-ice-cream


Crispy Chilly Corn with Mushrooms

Crispy Chilly Corn with Mushrooms

If I have to describe this recipe in two words- Simple and Amazing. And yes these two words perfectly describe this recipe, because its really simple to make and amazing to taste.
So lets get started..

Ingredients:
1 packet corn kernnels( 200gms approx)
2-3 table spoons corn flour
Oil for frying
1 table spoon oil
1 capsicum sliced
3-4 button mushrooms sliced
1/2 carrot, chopped
2 cloves chopped garlic
1 spring onion along with its greens
1 table spoon soy sauce
1 table spoon vinegar
1 table spoon chilly garlic sauce
Salt to taste
1/2 tea spoon ajino moto.
Directions:
Take out the corn from the packet, and pat dry in a tissue.
Add cornflour to the corn and let it rest for about 30 minutes.
Heat oil in a wok and fry the corns till golden brown in colour, just be careful, at times the corns tend to splutter. To avoid them spluttering over your hands or face, just half cover the wok with a lid.
Remove them on a tissue paper once golden brown in colour and drain out any excess oil.
In another pan, heat oil, add garlic and brown it.  Add onions without the greens and sauté will light golden brown. Now add mushrooms and sauté for a couple of minutes. Add the capsicum, carrot and onion greens, now add the sauces one by one and stir it for another minute or so. Add salt, and ajino moto and another gentle stir and your crispy chilly corn is ready.
A perfect snack for winter evenings. Enjoy…!!
Masala Egg Muffins

Masala Egg Muffins

A very very simple and interesting way to satiate your mid time hunger cravings…


Ingredients( yields 6 muffins)

1 medium onion chopped
1 small capsicum chopped
1 small tomato chopped
2 eggs
1/4 cup milk
1/4 cup oil
1/2 teaspoon baking powder
salt to taste
1/2 teaspoon black pepper
1/2 teaspoon chaat masala powder
2 cubes grated cheese

Directions: 

Grease your muffin tray using some oil and keep it aside. Pre- heat you oven to 180 degrees C.
In a bowl, mix all the chopped vegetables together.
In another bowl, beat the eggs, add milk, oil and baking powder and beat them a little more. Now season it with black pepper, chaat masala, and salt( be careful of not using too much salt, as chaat masala also has salt in it). Beat it till light and fluffy.
Now take the muffin tray and fill each cavity about half with the vegetables. Sprinkle grated cheese over it generously. Now fill the cavity with beaten egg mixture, just leaving about quarter of an inch of space.
Bake this at 180 degrees C for 20-25 minutes and you have a lovely egg muffin ready. Accompany it with a mug of hot soup of your choice and it will serve as a perfect evening snack for the coming winters.


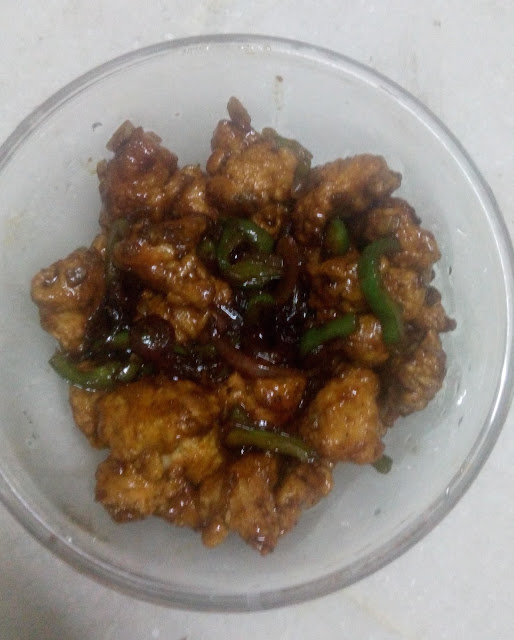
Chilly Chicken Dry

Chilly Chicken Dry

This one is a sure shot hit at my place, Its my son’s favourite and almost an every weekend affair.


Ingredients:
250gm boneless chicken shredded into thin strips
1 table spoon ginger garlic paste
2 cloves garlics chopped
1 table spoon chilly garlic sauce
1 table spoon soya sauce
1 table spoon vinegar
1 teaspoon honey
½ teaspoon brown sugar
1 onion cut into rings
1/2 capsicum shredded into strips
1/2 teaspoon ajino moto
2 table spoon refined oil
salt to taste

For frying the chicken:
2-3 table spoons all purpose flour
1 egg
1/2 teaspoon black pepper powder
1/2 teaspoon salt
a pinch of ajino moto
water for mixing
Oil for frying

Directions:
Take the all purpose flour in a bowl, and add rest of the ingredients, adding water, make a mixture of coating consistency. Dip chicken strips in this batter, and deep fry until golden brown in colour. Keep them aside.

Now in a separate wok, take oil, and add chopped garlic, saute it for sometime, then add ginger garlic paste, saute it a little more. Then add the onion rings and honey, and sauté till onions turn little brownish in colour. Now add the brown sugar and let the onions caramelize a bit more.
Now add the red chilly sauce, soya sauce and vinegar to the onions and garlic and sauté it for a couple of minutes on high flame. Add the fried chicken, and capsicum, stirring continuously, sauté it on medium flame for another two minutes. Now season it with ajino moto and salt and let it simmer for a couple of more minutes.
A very very yummy easy chilly chicken dry is ready to be served.


Riot of Flavors

Riot of Flavors

This cake is a true delight for the ones who want not just one but three flavours in a single cake..simply delightful…


Ingredients for the cake:

10 heaped spoons flour
1/2 cup oil
1 cup castor sugar
3 eggs
1 spoon baking powder
A pinch of baking soda
3 spoons curd
1 spoon vanilla essence
Food colouring- red, green and orange
Directions:
Sieve together the flour, baking powder and baking soda. In another bowl, add sugar and eggs and beat them lightly. Add oil to this mixture. Now add the dry ingredients to this wet mixture, put curd and vanilla essence, mix nicely.  Divide this mixture in 3 parts and add the colours red, green and orange and mix gently. Grease the cake tin and pour the mixture into it line wise, one colour at a time, to make three different lines of the colours. Bake for 30-35 minutes at 170 degrees C or till the toothpick inserted comes out clean.
After the cake is done, let it cool for sometime, then remove and let it completely cool on a wire rack.
Ingredients for the Icing:
1 1/2 cup whipped cream
3 table spoons strawberry crush
3 table spoons kiwi crush
3 table spoons orange crush
Directions:
In a large bowl, whip the cream until stiff peaks are formed. 
Arranging:

Transfer the cooled cake to a turn table, cut it in half from the centre. Moist the cake by sprinkling some water on it. Gently spread the whipping cream over it and cover the cake with top piece. Spread the remaining cream on the top of the cake and fully cover it. Add some cream to a piping bag and decorate your cake as desired preferably giving three equal spaces by creating boundaries. Now fill up each space with the crush of your choice, you don’t have to necessarily line the top colours with the base colours of your cake, this way however you cut, you will get a contrasting colourful cake, with a different colour on the top and a different colour of the base, though its purely your choice, I like it this way. A hint of surprise is always good. And there you have a colourful looking and amazingly tasty cake , you get 3 flavours to experience in one cake…


Chocolate Chip Mousse Bites

Chocolate Chip Mousse Bites

Ohh.. this is one of the best ways I use my leftover whipped cream and chocolate ganache( Sometimes, you just whip a little extra, and make some extra ganache too) or there are times when I need to purposely make these..as my son is just too fond of them.. they simply get vanished in a matter of few minutes.. I am sure you all will enjoy making and eating them as much as I do..and its really simple and easy to make..


Ingredients:

200ml whipping cream
200 ml chocolate ganache
1 table spoon gelatin
2 tea spoons cold water
2 tea spoons hot water
a few chocolate chips, both dark and white
Cookie cutters


Directions:

Whip the cream on high speed for about 10 minutes till stiff peaks are formed.
Using a spatula, fold in the chocolate ganache in to the cream.
Dissolve gelatin powder in cold water and let it soak for a couple of minutes, then add hot water and mix it properly.
Add this gelatine to the cream and ganache mixture.
Gently fold in a few chocolate chips into it.
Now on a baking sheet or a normal plate, arrange your cookie cutters.
Pour this mixture into the cookie cutters and fill up till the brim.
Tap it gently and garnish with a few more chocolate chips, and then let it set in fridge for about two hours.
Once it is firm and set, gently remove the cookie cutters and ta daaaah.. you have yourself mouth melting chocolate chip mousse bites..

P.S. Kindly do ignore the slightly untidy look of these bites as my son did not have the patience to let them set completely and removed them little before hand 🙂


Blackcurrant Swiss Roll

Blackcurrant Swiss Roll

As compared to the common myth, swiss rolls are actually quite simple to make, and I bet you will enjoy the process and be very glad with the outcome, I remember when I made it for the first time and it turned out super cool, it seemed like an achievement,
and left me exhilarated. So lets get started..

Ingredients:

  • 4 eggs
  • 125 gms castor sugar and a couple of spoons more for dusting on the surface
  • 2 tablespoons warm water
  • 125 gms refined flour
  • 2 drops of purple food colouring
  • 1-tablespoon vanilla extract


Directions:


  • Line the base of a 10 by 15-inches swiss roll pan with a baking sheet. Grease the base and sides of the sheet with melted butter and dust some flour.
  • Take a large bowl, and whisk eggs and sugar together, till light and fluffy, approx 5 minutes of whisking at high speed will give you the desired consistency. Then add water, followed by vanilla extract
  • Sift in the flour, about 1/3rd at a time and with a metal spoon, fold it in the egg mixture.
  • Now separate about 3 tablespoons of this mixture in another bowl and add 2-3 drops of purple food colour and mix gently.
  • Fill a piping bag with the mixture and draw a patter of your choice on the baking sheet. Put this in oven and bake for about two minutes to let it set.
  • Now pour the remaining white mixture gently into the prepared pan, and bake in the oven until the center of the cake is slightly springy and the edges have shrunk a little from the sides of the tin, about 12 to 15 minutes.
  • Spread out a piece of baking sheet, which is slightly bigger than the tin on a work surface and sprinkle evenly with caster sugar. Turn or invert the pan onto the sugared parchment paper, and then carefully remove the tin and parchment paper from the bottom of the cake.
  • Put over a slightly damp kitchen towel over the cake and let it cool down for sometime, this will prevent cracks and breaking of the cake.

Ingredients for the filling:

2-3 table spoons black currant crush

Arranging:

  • When the cake is cool, spread the jam sparingly over the cake, leaving a 1-inch border.
  • Now with the longest side facing you, roll up the swiss roll away from you, then transfer to a plate to serve.
  • Sprinkle the cake with caster sugar or dust with icing sugar to finish and you have yourself an amazing looking and awesome tasting, soft and succulent black currant swiss roll.


Blueberry Cake with a Blackcurrant Twist…

Blueberry Cake with a Blackcurrant Twist…

Ingredients for the cake:

15 heaped spoons flour
2/3 cup oil
1 1/3 cup castor sugar
3 eggs
1 spoon baking powder
A pinch of baking soda
1/2 cup milk
3 spoons curd
1 spoon vanilla essence


Directions
Sieve together the flour, baking powder and baking soda. In another bowl, add sugar and eggs and beat them till light and fluffy. Add oil to this mixture and whisk gently, now add milk, curd and vanilla essence and give it another whisk. Gently fold in the dry ingredients to this mixture. Grease the cake tin and pour the mixture into it. Bake for 30-35 minutes at 170 degrees C or till the toothpick inserted comes out clean.
After the cake is done, let it cool for sometime, then remove and let it completely cool on a wire rack.

Ingredients for the Icing:
1 1/2 cup whipped cream
1/2 cup blueberry crush
100 gms icing sugar 
4-5 spoons blackcurrant crush
some purple food colour

Directions
In a large bowl, whip the cream until soft peaks are formed. Add icing sugar and whip some more. Then add the blueberry crush and whip till firm peaks are formed. Divide this cream into two parts. Let the first part be. In the second part, add 2-3 drops of purple food colour and fill in the piping bag. I used multi point nozzle for the same. From the first part, take a small amount a fill another piping bag using another nozzle, an open star or weaving nozzle.

Arranging

Transfer the cooled cake to a turn table, cut it in half from the centre. Moist the cake with sprinkling some water on it. Now generously spread the black currant crush over it and then spread the blueberry icing over it and cover the cake with top piece. Repeat the process of moisturising it with water, then spreading black currant crush and finally covering it entirely with the blueberry icing. Now using the blueberry cream-piping bag, create big flowers over the cake. Now using the purple coloured icing, create a grass like effect all over the remaining part of the cake. Use some coloured sprinklers on the flowers and you have yourself an amazing looking and awesome tasting blueberry cake with a twist of blackcurrant…!!